The interior layout of an Air Conditioner in a minibus is crucial for comfort, energy efficiency, and space utilization. It’s not simply about “finding a place to install air vents,” but a complex aerodynamic engineering system. Minibuses are long and tall, and improper layout can easily lead to “cold front, hot back” or “hot top, cold bottom” conditions.
Air Conditioner In Camp – Core Design Principles
Airflow Circulation is King:The goal is to create an effective “loop” for cool air, avoiding dead zones. Cool air sinks and must be “pulled back” to the air conditioner through return vents for further cooling.
Functional Zoning, Differentiated Supply:The temperature requirements of the driver’s area (controlled by the Rv Aircon), living area, sleeping area, and bathroom area differ, and each should be able to be controlled independently or with priority.
Avoid Direct Airflow: Especially in the sleeping area, cold air blowing directly on the head can easily cause discomfort and colds.
Balancing Aesthetics and Space: Air ducts and vents should be concealed as much as possible or integrated with the interior design to minimize encroachment on headroom and storage space.
Maintenance access is provided: ensuring the filter can be easily removed and washed, and the evaporator unit can be inspected when necessary.

Air Conditioner In Camp – Layout Options (Select based on the number of air conditioners)
Suitable for: Minibuses with limited budgets, shorter vehicle lengths (under 7 meters), and good insulation.
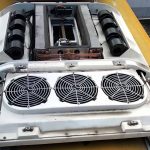
Air Conditioner Installation Location: Front-middle section of the roof (approximately 1/3 of the way down the passenger compartment).
Exhaust Vents: The main exhaust vents face the rear of the vehicle, utilizing the long, narrow shape of the compartment to propel the cool air backward like a “bullet train.” Auxiliary exhaust vents can be added on the sides or top of the middle of the compartment to guide some of the cool air to the sides via ducts.
Return Air Vents: Must be installed directly below the air conditioner or slightly towards the rear of the vehicle. This allows the warmed air at the rear of the compartment to be drawn back, creating a circulation.
Disadvantages: Cooling is slower at the very rear of the compartment, requiring more time.
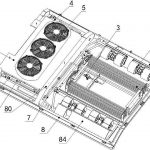
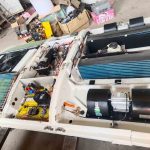
Air Conditioner In Camp – Key Component Design Details
1. Duct System (The “Highway” of Cooling)
Materials: Square, dedicated air conditioning ducts lined with insulation must be used to minimize cold loss and condensation during transport.
Main Duct: Leads from the air conditioner evaporator unit, should be as short and straight as possible, minimizing bends. Each bend results in a loss of air pressure and airflow.
Branch Ducts: Lead to individual air outlets. A plenum box should be used at branch points to ensure uniform airflow at each outlet.
Sealing: All connections should be tightly sealed with aluminum foil tape to prevent air leakage.
2. Air Outlets (The “Distribution Stations” of Cooling)
Type Selection:
Spherical Universal Vent: Most flexible, allowing for easy adjustment of direction and airflow, suitable as a main air outlet.
Strip Grille Vent: Aesthetically pleasing, can be concealed under cabinets or on side walls, with a smaller range of airflow adjustment but a gentler airflow.
Closable air vents: These can be completely closed in areas where airflow is not needed, concentrating airflow to the desired area.
Installation location:
Height: Recommended for a side wall or ceiling position at least 1.8 meters above the ground. Cool air sinks from top to bottom, creating an optimal temperature gradient (cool head, warm feet).
Direction: Avoid direct contact with sofa cushions or bed heads. Orient towards passageways, walls, or unoccupied areas, allowing cool air to diffuse naturally.
3. Return air vent (the “heart” of the circulation system)
Location: This is the most easily overlooked but crucial design element. It must be installed where warm air inside the car can naturally gather and recirculate.
Optima location: Directly below or near the indoor air conditioning unit, maintaining the furthest distance from the air outlet, forcing air to circulate throughout the room.
Bathroom area: A small return/exhaust vent can be installed above or inside the bathroom door, connected to the main return air vent via a duct to solve the problem of stuffiness in the bathroom.
Size: The return air vent area should be at least 1.5 times the total area of the outlet air vents to ensure unobstructed return airflow and prevent “whistling” sounds.
Filter: An easily removable and washable pre-filter must be installed at the return air vent to protect the air conditioner evaporator.
Air Conditioner In Camp – Final Design Process Suggestions
First, determine the furniture: Determine the locations of the seating area, bed, kitchen, and bathroom.
Next, determine the air conditioning: Based on the functional area division, decide the number of air conditioners and their installation locations.
Plan the air ducts: Like planning plumbing and electrical systems, draw the air duct routes on the drawings to ensure they can be concealed within the interior ceiling or cabinetry.
Mark the vents: Accurately mark the location and type of each outlet and return air vent.
Collaborate with construction: Communicate closely with electricians (wiring), carpenters (ceiling and cabinetry), and air conditioning installers to ensure the plan is implemented effectively.
An excellent air conditioning layout for a minibus RV makes the cool air “invisible and audible, but felt everywhere.” Through scientific airflow organization, it creates a uniform, gentle, and quiet environment, making your RV a truly comfortable mobile home.
Related posts:
 Bus Air Conditioner is used for buses and medium-sized commercial vehicles
 Introduction to Ac For Bus
 Motorhome Air Conditioning and Minibus Manufacturer Matching
 Rv Ac Unit Repair
 Bus Con Supplier reminds all bus owners to clean BUS AC
 How Coaches HVAC Works & How to use Coaches HVAC
 Camper Air Conditioner