Ac For Camper and Mini Bus Ac installations share similarities, but Ac For Camper and Mini Bus Ac installations place greater emphasis on reliability, efficiency, and standardized production for commercial operation.
| Model | KK-30 | KK-50 | KK-100 | KK-120 | KK-140 | |
| Cooling Capacity | 3KW/10300BTU | 5KW/17166 | 10KW/34121 | 12Kw/42000BTU | 14KW/48000BTU | |
| Voltage | DC12V/24V | DC12V/24V | DC12V/24V | DC12V/24V | DC12V/24V | |
| Driven Type | Engine Driven | Engine Driven | Engine Driven | Engine Driven | Engine Driven | |
| Installation | Rooftop | Rooftop | Rooftop | Rooftop | Rooftop | |
| Condenser | Fan Qty | 1 | 2 | 2 | 2 | 2 |
| Air Flow Volume | 600m³/h | 680m³/h | 3800m³/h | 3200m³/h | 3800m³/h | |
| Evaporator | Blower Qty | 1 | 1 | 2 | 2 | 4 |
| Air Flow Volume | 750m³/h | 850m³/h | 2000m³/h | 2000m³/h | 2000m³/h | |
| Condenser Fan | Axial Flow | Axial Flow | Double axle and centrifugal flow | Double axle and centrifugal flow | Double axle and centrifugal flow | |
| Compressor | KC 5H14, 138cc/r | 5H14, 138cc/r | HL22, 212cc/r | Valeo TM21, 215 cc/r | HL32, 313cc/r | |
| Refrigerant | R134a, 0.8KG | R134a, 0.9KG | R134a | R134a | R134a | |
| Dimensions (mm) | 750*680*196mm | 755*745*190 | 1010*975*180 | 1660*1240*210 | 1520*1100*175 | |
| Application Vehicles | Rv Camper Motorhomes & Minibus | Rv Camper Motorhomes & Minibus | 6-6.5m minibus or caravans | 6-6.5m minibus or caravans | 6-6.5m minibus or caravans | |
BUSCLIMA explains that to ensure successful installation, installation engineers should follow strict installation procedures to guarantee reliability, efficiency, and safety.
I. Ac For Camper Installation Pre-Installation Assessment and Design Planning
Vehicle and System Selection
1. Different brands and models of vehicles have their own dedicated air conditioning kits or mature retrofit solutions. A matching model must be selected.
2. Calculate the required cooling capacity (BTU/h) based on the cabin volume, maximum passenger capacity, and the climate of the operating region (e.g., higher requirements in hot and humid southern regions).
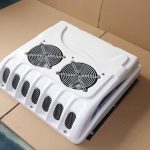
3. The evaporator and condenser are integrated into a single unit on the roof. Installation is relatively simple, with a short air duct, but it increases vehicle height and center of gravity.
Layout Planning
1. Design the air duct layout to ensure that cool air is evenly distributed to every corner of the cabin, especially the last row. The return air vents should be positioned appropriately to avoid airflow short-circuiting.
2. This is crucial! It’s essential to verify whether the vehicle’s original alternator output power is sufficient to drive the air conditioning compressor. If insufficient, the alternator must be upgraded; otherwise, the entire vehicle’s electrical system will be paralyzed.
3. Plan the routing of refrigerant copper pipes, power cables, and control lines in advance, avoiding moving parts, high-temperature areas, and sharp edges.
BUSCLIMA emphasizes that a successful AC For Camper and minibus AC installation is a combination of meticulous planning, standardized construction, and rigorous testing. Its ultimate goal is to achieve a complete system that integrates seamlessly with the vehicle and operates reliably and efficiently. Visit www.busclima.com or contact busclima@kingclima.com for detailed installation instructions.
II. Detailed AC For Camper Installation Steps
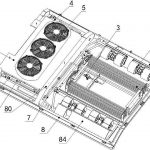
Whether it’s an RV or minibus AC installation, it can be viewed as the installation and connection of four core components: compressor, condenser, evaporator, piping, and electrical circuitry.
Step 1: Install the Compressor
1. In the engine compartment, secure it to the engine block or chassis using a dedicated bracket.
2. It must be able to withstand the severe vibrations of the engine and the weight and torque of the compressor itself.
3. The compressor pulley must be precisely aligned with the engine crankshaft pulley. Belt tension is crucial—too loose will cause slippage, squealing, and no cooling; too tight will damage the compressor and water pump bearings.
Step 2: Install the Condenser
1. Typically installed at the front or upper rear of the roof, ensuring good ventilation and heat dissipation.
2. The bracket must be sturdy, and the connection to the roof must be fully waterproofed using high-quality sealant.
3. Ensure there are no obstructions in front of the condenser, allowing the fan to effectively draw in air and hot air to escape smoothly from the rear.
Step 3: Install the Evaporator and Air Ducts
1. One in the center of the roof or one at the front and rear for even cooling.
2. Precisely drill holes in the roof’s load-bearing structure (frame) according to the evaporator unit dimensions. Never drill holes in non-load-bearing panels!
3. Apply a continuous layer of sealant to the mounting base, place the evaporator unit on it, and securely fasten it to the roof structure from the inside out with screws. This is crucial for lifelong leak prevention.
4. Connect the main air duct and all supply air hoses, ensuring all joints are sealed with special tape to prevent cold air leakage and efficiency loss.
5. Install air outlet grilles and return air grilles on the vehicle’s ceiling.
Step 4: Connecting the Refrigeration Piping – [Core Technology]
1. Lay the dedicated air conditioning copper pipes connecting the compressor, condenser, and evaporator according to the planned route.
2. Use a special flaring tool to precisely machine the pipe ends, ensuring the contact surfaces are flat and flawless. This is the first step in preventing refrigerant leakage.
3. Use a double wrench to tighten all nuts to the specified torque, preventing damage to the flared ends.
4. Use a vacuum pump to thoroughly remove air and moisture from the system. The specified vacuum level must be reached and maintained for a period of time to confirm the system is well-sealed and dry. This is crucial for ensuring cooling efficiency and preventing ice blockage.
5. Accurately charge the specific type and weight of refrigerant oil and refrigerant according to system requirements and standards.
Step 5: Connecting the Circuit and Control System
1. The main power cable from the battery must be of sufficient diameter and equipped with a high-current relay and a fuse/circuit breaker with an accurate amperage rating.
2. Connect the thermostat, control panel, fan speed control module, pressure switch, electromagnetic clutch, etc.
3. All wiring harnesses should be protected with corrugated tubing or electrical tape and securely fastened to the vehicle body, away from high temperatures, moving parts, and sharp edges.
III. Ac For Camper System Testing and Debugging
Testing after the Ac For Camper and minibus AC installation is more important than the installation itself.
1. Use an electronic leak detector to rigorously check all refrigerant connections to ensure everything is in order.
2. Start the engine and maintain it at medium-high RPM (approximately 1500 rpm), then turn on the air conditioning to its maximum cooling setting.
3. Measure the temperature at the central air vents; below 10°C is excellent, and 10-12°C is good.
4. Use a pressure gauge to measure the pressure in the high and low pressure lines, ensuring they are within the standard range.
5. Functional Check: Test the fan speed, temperature adjustment, and mode switching (cooling/ventilation) to ensure they function correctly.
6. Observe whether the evaporator condensate drains smoothly outside the vehicle.
AC For Camper and Minibus AC Core Considerations and Final Recommendations:
1. Structural stability, electrical load, and refrigerant safety (high pressure, flammability) must be 100% guaranteed.
2. Minibus air conditioning installation is a complex project involving multiple disciplines such as sheet metal, electrical, and refrigeration. It is strongly recommended to entrust it to a professional bus modification shop or large auto repair shop. They possess experience, specialized tools, and qualifications.
3. Choose well-known brands (such as Denso, SanDian, Seiyo, etc.) and high-quality auxiliary materials (sealant, refrigerant, wiring harness). Although the initial investment is higher, it will ensure long-term stable operation and avoid operational losses and high repair costs due to malfunctions.