The installation of an RV Air Conditioner on a minibus is a highly specialized and demanding process. The standard installation process for this type of roof-mounted integrated air conditioner can be summarized into the following core steps and key technical points, and the entire process must be completed by a qualified professional RV conversion company.

The entire RV Air Conditioner installation process can be divided into five stages: planning and preparation, roof treatment, main unit installation, interior integration, and testing and debugging.
Stage 1: Planning and Preparation
1. Confirm the minibus model and year, and obtain the roof structure drawings. Accurately measure the dimensions, curvature, and internal structure (such as the location of reinforcing ribs) of the usable area of the roof.
2. Calculate the static and dynamic loads on the air conditioning unit (usually weighing 60-120 kg) and luggage, and assess the strength of the roof structure. If necessary, an auxiliary reinforcement frame should be installed inside the installation location.
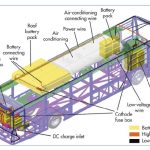
3. Determine the bus air conditioning power supply scheme (12V/24V/48V DC or 220V AC), and plan the cable path, wire gauge, and fuse/circuit breaker location from the battery to the roof.
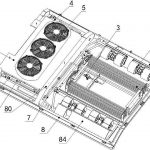
4. Select an Rv Air Conditioner model with an appropriate cooling capacity (BTU) based on the vehicle’s interior space and insulation.
5. Precisely mark the installation location on the roof. Golden rule: Avoid original structural reinforcements, sunroofs, satellite antenna mounts, exhaust vents, etc.
Second Stage: Roof Cutting and Reinforcement
1. Use a plasma cutter or high-precision CNC cutting equipment to cut, ensuring a smooth, flat cut and a perfect fit to the air conditioner mount’s sealing gasket. Tools that will cause significant deformation and burrs (such as gas cutting) are strictly prohibited.
2. Grind the cut edges to remove burrs and apply anti-rust paint.
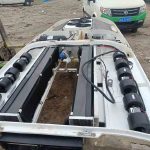
3. Inside the roof, install a reinforcement frame welded/riveted from high-strength aluminum or steel profiles around the opening. The frame must be securely connected to the existing vehicle structure to distribute stress and vibration during driving and serve as the mounting base for the air conditioning unit.
Phase Three: Air Conditioning Unit Installation and Sealing
1. Apply a continuous ring of high-quality, high-elasticity polyurethane sealant to the reinforced frame or roof mounting surface.
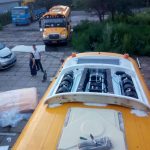
2. Use hoisting equipment to smoothly and accurately place the air conditioning unit into the opening, resting it on the sealant.
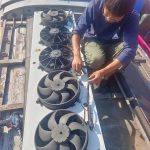
3. From inside the vehicle, use stainless steel bolts to firmly lock the mounting feet at the bottom of the air conditioning unit to the internal reinforced frame. Anti-loosening washers must be used, and tightening should be done in stages along a diagonal sequence to the specified torque.
4. Install the original factory air deflector, securing it with screws and sealant. It optimizes airflow at high speeds, reduces wind resistance and noise, and protects the air conditioning unit casing.
Phase Four: RV Air Conditioner Electrical and Control System Integration
Installing the RV air conditioner in a minibus is an extremely specialized and demanding process.
For more information on Rv Air Conditioner electrical and control system integration, visit www.busclima.com or contact busclima@kingclima.com for more professional technical drawings and wiring diagrams.
Related posts:
 Aircon Campers Compatible with Minibus Chassis
 Ac Unit For RV Camper: Air Conditioning System for Minibuses and Motorhomes
 Ac On RV for Minibus Caravan Conversion
 Ac In Camper for Minibus to Motorhome Conversion
 Fixing RV Ac is compatible with Southeast Asian minibus chassis
 Motorhome Ac is suitable for minibus/medium bus conversion plants
 Bus Air Conditioner is used for buses and medium-sized commercial vehicles
 SNVI Minibus Air Conditioning is largely absent
 Are Algerian’s poor hesitant to use SNVI Bus Con?
 Why Install SONACOME SNVI Bus Con?
 Finite Element Analysis of MTC MAN Bus Hvac
 MTC MAN Bus Aircon System
 Air Conditioner For Bus
 Ac For Camper and Mini Bus Ac Installation Steps
 China Higer Bus Air Conditioner
 SONACOME SNVI Bus Air Conditioner
 Air Conditioning Units for Campers Installation Process
 SNVI Bus Air Conditioner New Supplier